How to investigate TDV6 turbocharger noise
A whistling Land Rover Discovery 3 or Range Sport Sport turbo might be sorted by a simple cure, here’s how to fix it…

In an ideal world, the Land Rover Discovery 3 should be the most popular vehicle with enthusiasts. However, great as it is, the vehicle’s reputation puts many potential buyers off. It is mainly down to the fact that for some of the more difficult repair jobs the body needs to be raised from the chassis to comfortably reach components.
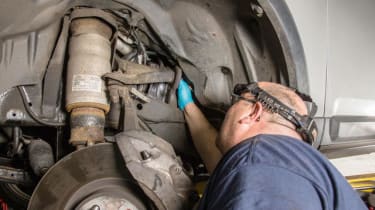
The turbocharger is a case in point. So restricted is the access between chassis, bodywork and engine that yes, the best way is to remove the body using a garage lift, despite the extra time involved in releasing the various (and sometimes corroded) fixings. However, with care and a little forethought it is possible to remove a turbo without raising the bodywork. Here, we’re working on James Holmes’ own Discovery 3 which had started making sounds suggesting imminent failure of the turbo.
A new turbo was ordered and we got his car on the vehicle lift. However, that all changed as we started to strip the car and investigate the problem. This is a reminder of how accurate diagnosis comes down to picking up every clue from the car and its components. We’re still accessing the same area as the turbo – through the near side wheelarch – so we can appreciate the space limitations involved.
Difficulty rating: 4/5 What’s needed: General workshop tools, ramps, jack, thread taps, exhaust paste, finger file, welding equipment.Time: 3 hours Cost: £0
Symptoms and diagnosis
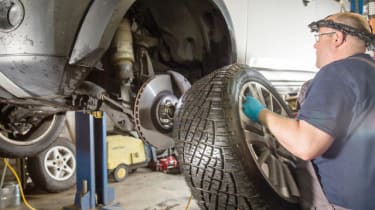
The symptom was a whistling sound from the turbo area, heard when the engine was hot or cold, and even at at tickover – typical of failure of a turbo shaft bearing. That’s not unknown after 115,000 miles, and the cure is a new or reconditioned unit. The turbo can be replaced by first lifting the body (best access but time-consuming) or with the body on (difficult but quicker). James decided to do it with the body on. But, while stripping the components around the turbo, a few items began to suggest the problem was somewhere else entirely. Sure enough, on checking the turbo manually – by reaching up with the exhaust downpipe removed, and feeling for any looseness in the turbo vane action and bearings – this confirmed the turbo was in good health.
Other components were then removed to reveal the real issue, and the cure was very simple. This shows the importance of diagnosing as you work and picking up the clues to reveal more about the problem, rather than jumping to conclusions by assuming a classic mechanical failure has occurred. Although many fixings were undone with ease, and ancillary components came off this 11-year-old Discovery easily, this may not be the case with a poorly maintained vehicle.
Diagnose as you go
With the internal parts of the turbo now reachable, James rotated the internal vanes, expecting to feel play or roughness in the bearings. Our turbo spun cleanly, suggesting it was in good health. James then checked the parts he’d removed. Although the car has an EGR blanking kit fitted, the system is still pressured as far as the blanking plate, and in our case, exhaust gas under pressure from the turbo was leaking past a joint on this pressurised, though redundant, part of the EGR system. From in the car, that produced the whistling noise, right by the turbo.
Simple inexpensive fix
Replacing this EGR elbow and gasket would cure the blow-by leak, but still leave the whole system pressured. Instead, James decided to simply blank the system off at the elbow, by making his own blanking plate from the elbow joint itself. This was partly done to demonstrate there are still DIY fixes for the supposedly complex Disco 3. Of course, James is an expert fabricator so, to quickly TIG weld up a blanking plate was a, simple, and obvious solution for him. Here’s how he did that, and put it all back together.
Conclusion
If we’d found the turbo had failed, we would have had to unbolt it to carefully slide it out under the car, likely removing the gearbox crossmember to make space. Thankfully, we didn’t have to do that, but we had the unexpected thread issue to deal with on reassembly. This is what it can be like to work on a Discovery 3. If that exhaust manifold thread couldn’t be re-cut, or had been damaged through forcing the thread tap, then we could have turned a simple job into something far more difficult.
What we couldn’t photograph was the fact that, even after clearing the thread, to start one of the two bolts in the blanking plate took me and my thin hands four attempts to get it to bite. So tight was the access that James simply couldn’t both slide his hand in and leave space to thread the bolt, despite 45 minutes trying. For that job, you needed a small hand to work in the tight space. These are complex vehicles in terms of packaging, and engineering, and need patience, otherwise a straightforward cure can finish up as a complex one.
Click on the gallery below for our handy step-by-step guide…
Find a car with the experts