How to replace front suspension and ball joints
Replacing worn ball joints on Discovery 3 and RR Sport
Original suspension bushes are long-lasting on the Discovery 3 and Range Rover Sport, assuming the vehicle is driven normally, on normal roads. Hard driving and off-roading will shorten their life. The same applies to the ball joints which locate the front lower suspension arms to the wheel hub assembly.
After 95,000 miles, the two front ball joints on my Sport were just beginning to show some looseness, so replacements were needed to pass the next MoT test, and also because it’s important to maintain accurate suspension geometry for the sake of tyre wear and handling. In theory, replacing the ball joints shouldn’t be too bad a job. There is a technique for removing the joint from the lower suspension arm and fitting a new one to it. But, to do this, means removing the suspension arm onto the bench and, because a complete aftermarket suspension arm complete with a new ball joint and the chassis attachment bushes is so reasonably priced, replacing the complete unit is cost-effective. It’s also quicker. Either way, if the bolts holding the suspension arm to the chassis and the damper/spring strut to the arm are seized, a lot of grief may be experienced in pulling the components apart.
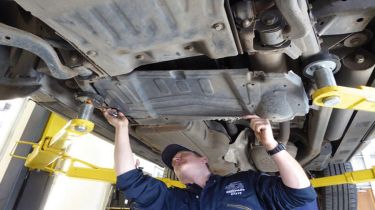
It’s not an average DIY job, unless you have good facilities and knowledge, because of the problems that might be encountered. If the vehicle is taken to a garage for this work, this feature will provide a good understanding of what needs to be done, and the background information to enable you to better discuss the work with your mechanic. The job here is being done in Britpart’s workshop with development mechanic, Steve Grant, who has a logical method and sufficient patience to overcome the most unexpected difficulties. Here’s how we did the job using new Britpart lower suspension arms, complete with ball joints and bushes. The pictures show the front left side arm being replaced using a two-post lift to securely support the vehicle. Before starting work, the suspension needs to be put into access mode.
Naturally, we changed both front suspension arm assemblies, though only the left side is shown in the pictures
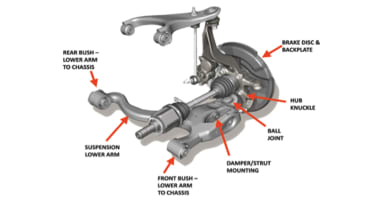
These are the left front suspension components we’ll be working on (as they would be seen looking from the front centre of the vehicle)
Removing the arm
The plan is to remove the damper/spring strut bolt and the inner bolts holding the suspension arm to the chassis, then to release the axle shaft inside the hub and swing hub outwards to release the ball joint. It’s worth first using a wire brush to clean all the bolt threads, nuts and washers and applying WD40 to the threads to soak for a period before starting to dismantle. We’re hoping it all comes apart as intended, but these bolts can rust and seize tightly, calling for an air-powered saw to cut the arm out.
Releasing axle halfshaft
Depending on your vehicle specification (early Discovery 3 manual for example) there may be only 25 mm clearance between the axle CV joint and the top of the suspension arm ball joint. If so, there will not be sufficient space for the ball joint to rise out of the hub knuckle when removing the suspension arm from the car. In that case, it’s necessary to remove the axleshaft stake nut in order to push the axle in slightly through the hub. This allows the hub to be moved outward a little to give more space, but not too far, to avoid the drive shaft joint separating. The relatively small axle CV joint on the Range Rover Sport shown here gives 40 mm clearance, which is sufficient without releasing the axleshaft. Although unnecessary on the Sport, we went through the procedure on this vehicle to illustrate the steps involved. So, if you have only 25 mm clearance, follow the steps below.
Repair options
The reason for doing this particular job is to replace the worn ball joint and, as we said earlier, with the correct splitting tool it can be changed with the suspension arm still in place on the vehicle. But, as we saw, one of the arm bushes is in need of replacement and, generally, if the ball joint is worn we can expect the bushes to be reaching the end of their life, and some bolts beginning to seize. After removing the arm, the bushes can also be replaced individually, and aftermarket prices for these parts are quite low, but the tools to replace the bushes cost around £500 and they are needed if the job is to be done properly. So, it’s far cheaper to fit a brand new aftermarket OEM suspension arm which has new bushes and a ball joint already fitted. It also saves a lot of labour time. An aftermarket fitting kit replaces all the old bolts, nuts and washers and makes reassembly quicker, though it’s necessary to transfer the setting marks we put on the old washers, onto the new washers, as we’ll see in the assembly pictures later.
Reassembling the suspension
Accuracy is vital here when transferring the marks that we made on the cam washers before dismantling, onto the new cam washers ready for assembly. The same degree of accuracy is needed when rotating the cam bolts to adjust the position of the suspension arm after the components have been refitted to the vehicle. To prevent future corrosion, it’s worth applying anti-seize grease to all the bolts and washers before assembly and, if using the original bolts and washers, to give them a good wire brushing and soak in penetrating oil before drying and greasing them.
Cam bolts explained
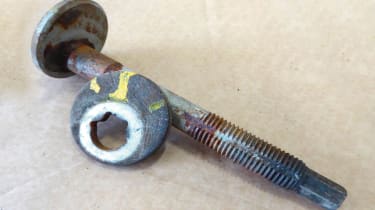
Showing the bolt with fixed cam at the head, and the loose cam washer, which is keyed to grooves in the bolt and fitted at the nut end
The suspension arms are held to the chassis by cam bolts. The bolts incorporate a fixed eccentric cam washer as part of the bolt head, and another cam washer at the opposite end positioned under the nut. This second, loose, cam washer is keyed to grooves on the bolt shaft so that it rotates (with the cam washer at the bolt head) when the bolt is turned. Each cam washer contacts raised sections on the chassis plate so that, when the bolt head is turned, the cams force the bolt (and thus the suspension arm) inward or outward to adjust the suspension geometry.
It is essential to get this adjustment correct, otherwise handling and tyre wear will be adversely affected. Ideally, a four-wheel alignment check should be carried out after any work involving a reset of the cams or renewal of any suspension parts that may affect the wheel alignment. Having said that, the handling and tyre wear of the Range Rover Sport shown here has remained okay after doing the job, which is testament to the original setting being correct in the first place, plus the fact that Steve obviously made an accurate job of transferring the marks to the new bolts’ cams, and reset them accurately during reassembly. Always treat the bolt shanks and threads with anti-seize grease before fitting them, to assist dismantling during any future repair work.
Parts used
• Front suspension arms: (RH) Britpart number LR 029304G, (LH) Britpart number LR 029305G (around £130 each) • Fitting kit of bolts, nuts and cam washers, and including a new axle stake nut: Britpart number DA 7205 (around £30 per side) • Assorted new fittings as needed
Tools
General workshop tools, two-post lift, transmission jack, circlip pliers, special tools as mentioned in captions and panels
Time: 2 hoursCost: £160 per side
Click on the gallery below for our handy step-by-step guide…