Tamiya RC cars: history, greatest models and build tips
We chat to Tamiya about how it became the go-to for RC cars, plus we build our very own Toyota GR Yaris

Radio-controlled (RC) cars come in all shapes and sizes and are made by countless companies, but one of the oldest and most respected players is Tamiya.
Founded in 1946 in Shizuoka, Japan, by Yoshio Tamiya, the company began as a sawmill before producing wooden models in 1948. The sawmill shut in 1953, when Tamiya became a dedicated maker of models, moving into plastic kits in 1960. Tamiya sells myriad sets today – both radio-controlled and static – of cars, motorbikes, lorries, military vehicles, ships and aircraft, as well as all manner of tools and finishing materials. The firm is perhaps best known for its radio-controlled cars, though, the first of which appeared in 1976 in the shape of a 1/12 scale Porsche 934 Turbo.
Faithfulness to the vehicles on which its models are based is core to Tamiya, but the technology and processes behind its radio-controlled cars have changed over time.Tamiya bought, stripped down and rebuilt a real 911 to create its 1976 Porsche, for instance, while today the firm works with manufacturers from an early stage, allowing it to produce licenced, scale radio-controlled vehicles in a timely fashion, appealing both to petrolheads and model hobbyists for whom accuracy is all important.
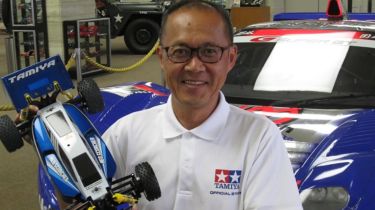
Dr Fumito Taki is Tamiya’s head of RC engineering and design, and he was the one that added an electric motor into the Porsche kit in 1976. Dr Taki says Tamiya decides which cars to recreate by “considering their history” and based on how well known they are, while some kits come about following requests from modellers and car makers – the Ford Escort Mk2 and Land Rover Defender were prompted by feedback from Tamiya’s UK distributor.
The process for gaining licenses is usually “fairly smooth” due to Tamiya’s reputation, Dr Taki says, and the firm uses computer-aided design (CAD) data as the basis for its models, although “sometimes our work starts with drawings made from detailed photographs”.
Tamiya has close relationships with car makers, as Dr Taki expands on: “In the case of the Toyota GR Supra, Tamiya and Toyota launched their respective cars on the same day, and we have followed this with the GR Yaris available at the same time in the UK as the real car. To achieve this there was an unprecedented level of co-operation and CAD data made available to Tamiya designers. For the GR Yaris, we even had a Toyota dealer display both cars side by side in the dealership.”
Creating a scale model of a new car “generally takes somewhere between six and 12 months”, with the trickiest stage being “the development and production of the body mould”. Dr Taki explains: “When using vacuum-forming, creating test moulds and then making adjustments is vital in ensuring the final product is suitable and looks right for the mass production.”
Tamiya has plenty of car nuts in its employ, and Dr Taki says “we also have a lot of staff who are motorsports enthusiasts”. Interestingly, Tamiya “has also hired designers from car manufacturers”. With such interplay with car firms, have Tamiya’s projects ever influenced car makers? “Yes,” Dr Taki replies. “We are working on one now, but it’s subject to an NDA [non-disclosure agreement]!”
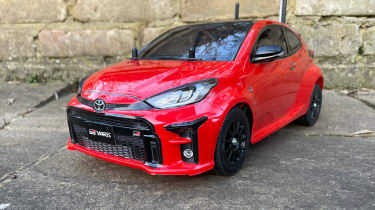
As well as accurate bodyshells, decals – detailed stickers with transparent backgrounds – are key to Tamiya. The GR Yaris we built has more than 70, and such is the attention to detail that the driver’s door-handle decal has a keyhole graphic, while the passenger-side handle does not – just like the real thing. “Decals and stickers are an incredibly important part of any successful kit.” Dr Taki explains. “It’s a balance though to decide on the final specification, and if we focus too much on adding details it just increases the cost.” Tamiya uses photographs to design its decals, but with less well known vehicles the firm “will try to get a first-hand look at the car”.
Guide to building our Toyota GR Yaris
I was terrible at staying in the lines when colouring in at school and have no mechanical qualifications, so don’t think turning the kit into a finished radio-controlled car requires innate artistic or engineering talents.
It does require patience, a methodical approach, 30 or so hours of your time, plus some rudimentary tools, though. With these provisions, making the most of the extended time so many of us are spending at home
has rarely been more rewarding. The following guide is intended to demonstrate the appeal of RC cars and give a few pointers for anyone daunted by where to begin.
It’s geared around Tamiya’s GR Yaris kit, but much of this applies to all radio-controlled cars.
It’s best to not approach the kit with the sole aim being to have an RC car. Yes, that’s the end result, but it misses the point: building it is just as enjoyable as driving it.
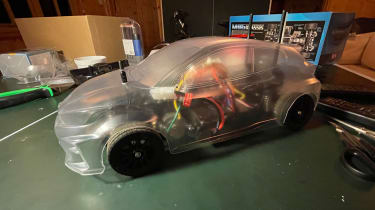
Some RC cars are straightforward, coming ‘ready to run’ out of the box; others feature a single-piece chassis to which the electronics, wheels and a pre-painted bodyshell are attached. The GR Yaris is more complex, and its construction can be broken down into six stages: chassis assembly; linking the radio gear; bodyshell cutting; paint preparation; painting; and applying decals.
Each stage requires its own approach, but all are rewarding – if you take your time; reading the instructions closely is also fundamental to a successful build. The screws, bolts, pins, gears and clips each step requires are detailed on the edge of the instructions; gather these in advance of embarking on a step. Reading three or four steps ahead is also advisable, because this allows you to understand how an assembled component fits in with the next stage.
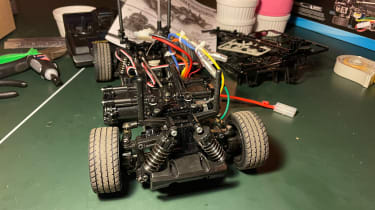
1. Chassis assembly
The chassis is built from numbered plastic parts that are attached to plastic ‘trees’ labelled A to F; snip off the parts each step requires using side cutters. Screws and other metal components come in alphabetised bags that should be opened in sequence as needed; use a ruler to measure screws and gears to ensure you select the correct ones, then follow assembly instructions for each step, applying grease (included) when instructed.
If you think you are making a mistake, stop and re-read the instructions. Parts should fit naturally, and while the ABS plastic is tough and replacement parts are easy to come by, force a component and you risk damaging it. Be sparing with modelling cement when gluing tyre foam into the tyres, and the tyres to the wheels.
2. Linking the radio gear
There are five electronic components to become familiar with. The ESC (electronic speed control) is the brain of the car. This connects to four subsidiary components: the motor, which drives the wheels; the steering servo, a small motor with a limited but powerful movement that controls the steering; the radio receiver, which reads your steering and accelerator inputs from the transmitter; and the rechargeable battery, which powers the whole show.
Charge the battery and pre-assemble the radio gear with the ESC and steering servo before installing them in the car to check everything works. This should be straightforward, because leads are colour and symbol-coded. Do not pre-connect the motor with the ESC, though – wait until both are fitted to the chassis as the leads fit snugly. Once the radio gear and motor are installed it’s obligatory to have a whizz around with the bare chassis, admiring your handiwork.
3. Cutting the bodyshell
Errorsduring chassis assembly can typically be reversed, but mistakes with the body can lead to damage; don’t remove the protective opaque outer film from the shell yet.
The polycarbonate shell is vacuum formed in one go, so has waste plastic than needs removing. Cut out the wheelarches and corners with a craft knife or scalpel, making gentle, repeated runs along the lines before bending along weakened joints. You can cut straight edges with sharp scissors, although we used a scalpel. After three or four scalpel runs waste plastic should fold away leaving crisp lines. The GR Yaris has light inserts that also need cutting out.
Drill or ream the marked holes for the antenna and body posts, then wash the shell and light inserts to remove contaminants before painting. Use cold water, a clean sponge and washing-up liquid; allow the body to air dry.
4. Masking up
Most kits come with masks for the windows and lights. Cut along the lines precisely and test-fit them before removing the backing. The masks for the lights are tiny and numerous; use a scalpel and tweezers to apply these.
Everything that isn’t to be black (most of the body) is now masked with tape. Once finished, press down on all masking with a microfibre cloth to ensure good seals – you don’t want the paint to bleed through joins in the tape.
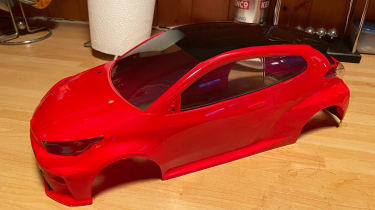
5. Painting
The GR Yaris needs four paints, and the darkest is applied first. Black for the roof, diffuser, grille and headlight inserts; red for the main body; transparent ‘smoke’ for the windows and windscreens; finally silver for the rear light inserts.
Less is more: you don’t want pools of paint in the shell, nor do you spray directly at it; apply the paint in passing strokes. This ensures an even finish and reduces the chance of paint creeping under weak spots in the masking.
Painting is less messy than you might imagine, but beware of overspray. Hold the shell on the outside and paint the inside, spraying from about 30cm away, passing in strokes that start from before the body and end after it, releasing the nozzle at the end of each pass. Three passes should be enough; look at the shell from the outside and hold it to a light to see if you have good coverage; you can now tell if you were careful enough with your masking, too. Put light inserts on a scrap of wood and paint the fronts black and the rears silver (again, from the inside); leave to dry.
Once the black is dry, remove the masking tape from the bodyshell (tweezers help), leaving the windows, windscreen and light masks on. Spray red with the same light touch; once the red is dry remove the window and windscreen masks and paint the glass with smoke. Once the smoke paint is dry, remove masks from the lights on the bodyshell.
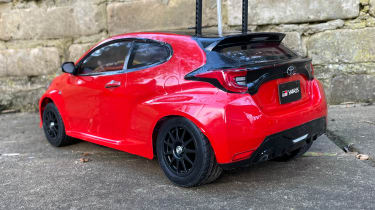
6. Decal delight
You can now remove the protective outer film from the body and light inserts and start applying decals. The beauty of these is that as well as bringing the details to life (the headlights have five decals each), the narrowness of some means they can be applied like tape, covering imperfect lines where black paint meets red on the roof, for example. Such precision means care is needed, so use small, sharp scissors, cutting as close to the decal edge as possible, applying in numerical order, using tweezers to help.
For the cost of a nice family meal out, there are few better ways to entertain yourself than building an RC car; the only tough decision now is whether to leave the pristine model as it is, or drive it (I reckon it’ll hit 20mph+) and risk a full-speed collision with a lamp post.
Find a car with the experts