How to replace radius arm bushes
When ride, harshness and steering feel was not up to scratch on a Defender 90

The Defender 90, owned by my friend Matthew Spoerri, is a well-sorted and capable off-road Land Rover. It is used mainly on weekend events with local clubs such as the Northern Ireland Land Rover Club (NILRC) and the North West 4x4 Club. Always striving to make his Land Rover as capable, reliable and protected as possible, Matt wasn’t happy with the ride and handling when driving to and from events on the open road. He had already changed the springs and dampers for a set-up that he knew worked well for him (the previous owner had opted for a very aggressive combination with an extreme suspension lift).
Matt had also fitted Super Pro bushes to the rear radius arms and A-frame to improve the ride, leaving the front bushes alone, because polyurethane bushes had already been fitted. The ride on the open road still was not right. Matt complained of a harsh and choppy journey. A clicking noise had also developed when taking up the drive and when stopping. To compound this, the steering was pulling to the left, despite having had the tracking checked and adjusted.
Matt is an experienced and sensitive driver and I had to agree with everything he said about the handling of his Land Rover when I took it out on a test drive. As many of the key suspects with handling issues had already been taken care of, I focused on the tyres and the front suspension bushes. Running on 265/75 R16 BFG Goodrich Mud Terrain tyres all around has never been a problem in my experience, but we swapped the wheels and tyres for a nearly-new set of Avon Rangemaster 7.50 x 16 (which is one of the standard factory fit sizes).
The tyre swap made very little difference to the handling problems and we concluded that the tyres were not the problem. Each front radius arm has two separate bushes locating it to the front axle, and a split bush locating it at the rear end to the chassis bracket – one half of the split bush on each side of the bracket – with the arm’s rear stud passing through this combination. The polyurethane bushes fitted to Matt’s front radius arms were of unknown origin and, if unsuited to the application or worn, this might explain the harshness of the ride. The only way to determine the cause of the pulling to the left and the clicking noise, was to remove the radius arms for inspection. Removal of front radius arms can be carried out on the floor or driveway, provided that properly rated axle stands are used and a suitable trolley jack is available.
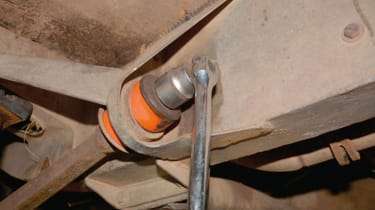
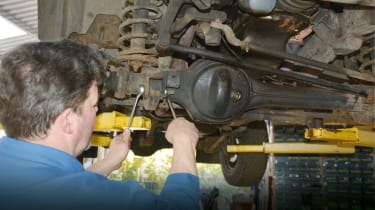
On a vehicle ramp, the wheel and suspension must be free moving, with a transmission jack or similar being available. Matt’s Defender was elevated on my two-post ramp with the front pads lifting at the bulkhead outrigger, leaving free travel for the front suspension. With the front axle supported by the transmission jack, the large M20 Nyloc nut at the chassis bracket was loosened using a 30mm socket wrench, with a breaker bar to get it turning initially. At the rear axle, the radius arms (the rears are correctly called lower link arms – the A-frame being the upper link) can also cause handling and steering issues, especially if the bush at the axle end is worn. Unlike the front, the rear arms are bolted with a single bush to the axle, and any play here can allow the axle to move slightly on one side during sudden acceleration or deceleration. This causes a slight rear-wheel steer, which is often subconsciously corrected by the driver at the steering wheel. Replacement of the rear link bushes is a similar job to the ones at the front.
Replacing the front radius arm bushes
The steering track rod, which runs across behind the front axle, needs to be removed or at least swung out of the way to allow removal of the radius arms. By detaching the steering arm at one of the track rod end joints, I was able to swing the rod and tie it out of the way. Each front radius arm is attached to the front axle by two M16 bolts, which are loosened and removed by a 24mm combination spanner and socket wrench. The radius arm is then pried down and out of the axle mount, taking care not to let it drop (wearing safety boots just in case). This is where the steering rod would have been in the way, as the radius arm is lowered down and pulled out of the chassis bracket during the same workshop operation. Once on the bench, the problems with the radius arm bushes became apparent.
Firstly, the polyurethane material of the bush was found to be much harder than OEM bushes and other polyurethane bushes I’ve handled, with little or no give in the material when pressed, or when attempting to flex them with a long metal rod through the centre. The clicking noise on drive take up (and stopping), as well as the pulling of the steering to the left, could also be explained – the inner metal bushings were worn, allowing excessive play between them and the fixing bolts.
There was also play between the inner bush and the polyurethane material. This wear was more pronounced on the left side, which would explain the poor steering geometry. The only solution was to replace the complete bush set in the front radius arms with new bushes – either OEM rubber bushes, or a high quality polyurethane bush that is not as hard as the old iones. We opted for a set of new bushes from Super Pro. These are available as a complete vehicle kit or as individual sets for the axle end and for the chassis end of the radius arms. Polybush, OEM or Genuine Land Rover bushes are also a very good choice and will probably offer a big improvement if your vehicle is running on tired bushes.
One of the benefits of polyurethane bushes is the ease of removal from the radius arms, and the ease of fitting the new ones. While the hydraulic workshop press was employed in this case, it was not really necessary, as the bushes can be pressed out and in with very relatively low pressure. Also the Super Pro bushes are designed to be used with a special grease supplied in the kit, which is applied to all polyurethane-to-metal interfaces. This grease also aids the insertion of the new bushes.
With the new bushes fitted, the radius arms were refitted to the axle using new M16 bolts and new Nyloc nuts. The bolts were liberally coated with copper grease to prevent them from seizing within the metal inner bush. At the chassis brackets, the radius arms had been inserted with one half of the chassis bush already on the radius arm. The other half was pushed on, followed by the grease-coated washer and secured with new M20 Nyloc nut. When tightening up the nuts at the axle end, the nut should be torqued up until the inner metal bush is soundly locked between the axle mount tabs, for all four bolts. At the chassis end, the M20 nut should be tightened to compress the bushes right up until the limit of the thread is reached, giving a secure lock to the chassis.
The result
Having been the first to test drive the Land Rover after replacing the front radius arm bushes, Matt reported that it was a good compliant ride, with none of the harshness experienced with the old bushes fitted. There was no longer any clicking from the suspension on taking up the drive, and the steering had become true, with no pulling to the left. I then drove it and found the handling and stability were much improved and there was less overall vibration in the vehicle. The feeling on the corners was as precise as any Defender can be. Result!
Tools: 19mm, 24mm, 30mm Socket wrenches and/or spanners. Pry bar, axle stands with trolley jack (or ramp and transmission jack). Copper malletTime: 2 hours: from £145Costs: Super Pro full Defender bush set circa £200. Super Pro Radius arm bush set £145.
Contact
Super Pro: www.superpro.eu.com Tel: + 44 (0) 1823 690 281 Email: info@superpro.eu.com
Health and safety
• Ensure the vehicle is securely supported on axle stands on a firm level floor with remaining wheels chocked and gear and handbrake selected.• When raising the axle with a jack, check that the vehicle weight is not lifted off the axle stands, and that the vehicle remains firm and stable as you work. • If using a hydraulic press, take care to avoid fingers becoming trapped, or components being ejected if out of alignment. Wear face protection. • Wear tough gloves when using power tools such as an angle grinder. Hold it with both hands to keep it stable.
Click on the gallery below for our handy step-by-step guide...